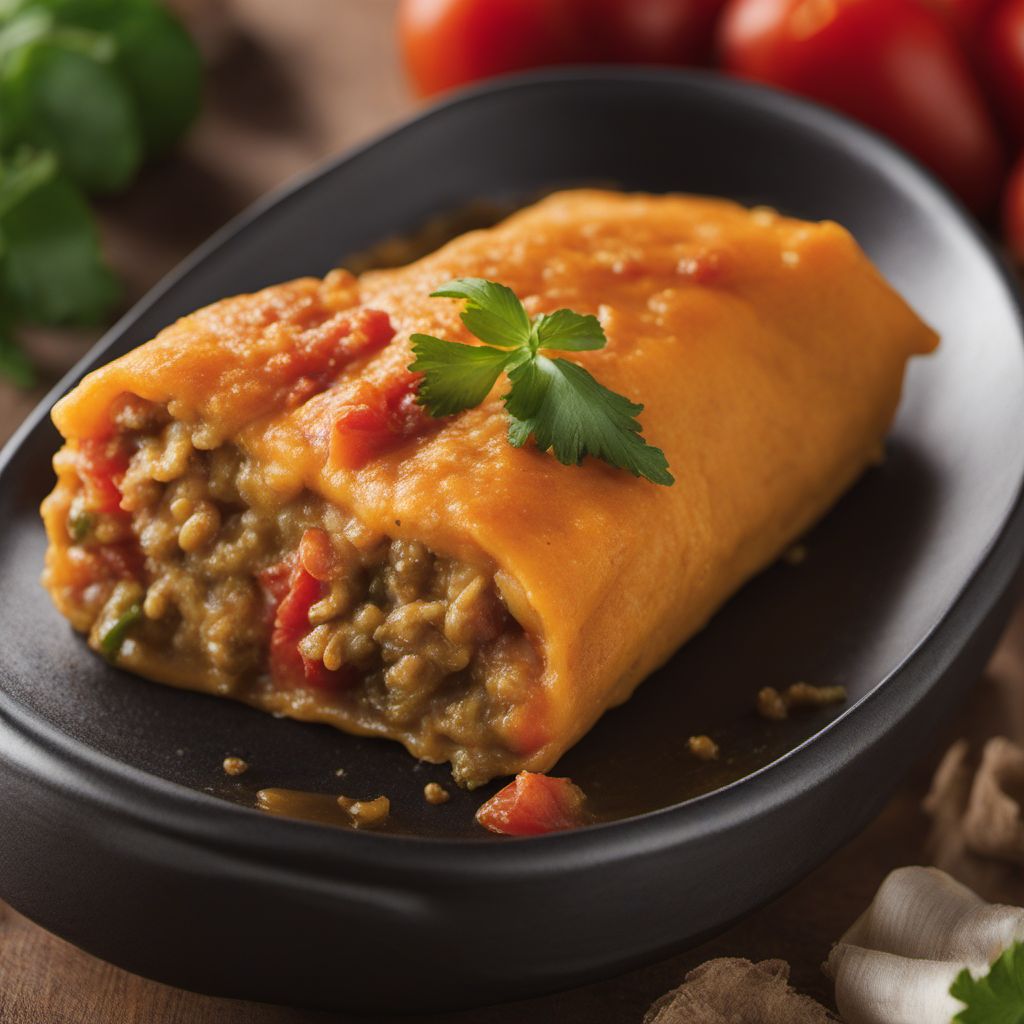
Recipe
Chile Pasilla con Queso Stuffed with Savory Goodness
Cheesy Pasilla Peppers: A Burst of Mexican Flavors
4.8 out of 5
Indulge in the rich and vibrant flavors of Mexican cuisine with this delectable recipe for Chile Pasilla con Queso. This dish showcases the versatility of pasilla peppers, stuffed with a savory cheese filling and topped with a zesty tomato sauce.
Metadata
Preparation time
25 minutes
Cooking time
30 minutes
Total time
55 minutes
Yields
4 servings
Preparation difficulty
Medium
Suitable for
Vegetarian, Gluten-free, Low-carb, Keto-friendly, Nut-free
Allergens
Dairy
Not suitable for
Vegan, Dairy-free, Paleo, High-protein, Low-fat
Ingredients
-
6 pasilla peppers 6 pasilla peppers
-
200g (7oz) Mexican cheese blend (such as Oaxaca, Chihuahua, or Queso Fresco), shredded 200g (7oz) Mexican cheese blend (such as Oaxaca, Chihuahua, or Queso Fresco), shredded
-
1 cup (240ml) tomato sauce 1 cup (240ml) tomato sauce
-
1 tablespoon vegetable oil 1 tablespoon vegetable oil
-
1 small onion, finely chopped 1 small onion, finely chopped
-
2 cloves garlic, minced 2 cloves garlic, minced
-
1 teaspoon ground cumin 1 teaspoon ground cumin
-
1 teaspoon dried oregano 1 teaspoon dried oregano
-
Salt and pepper to taste Salt and pepper to taste
Nutrition
- Calories (kcal / KJ): 250 kcal / 1046 KJ
- Fat (total, saturated): 15g, 9g
- Carbohydrates (total, sugars): 15g, 5g
- Protein: 15g
- Fiber: 4g
- Salt: 1g
Preparation
-
1.Preheat the oven to 180°C (350°F).
-
2.Place the pasilla peppers on a baking sheet and roast them in the preheated oven for about 10 minutes, or until the skins are blistered and slightly charred.
-
3.Remove the peppers from the oven and let them cool slightly. Once cooled, carefully peel off the skins and make a lengthwise slit on one side of each pepper. Remove the seeds and membranes, taking care not to tear the peppers.
-
4.In a skillet, heat the vegetable oil over medium heat. Add the chopped onion and minced garlic, and sauté until they become translucent and fragrant.
-
5.Add the ground cumin, dried oregano, salt, and pepper to the skillet. Stir well to combine the spices with the onion and garlic mixture.
-
6.Remove the skillet from heat and let the mixture cool slightly.
-
7.In a bowl, combine the shredded Mexican cheese blend with the cooled onion and spice mixture. Mix well until all the ingredients are evenly incorporated.
-
8.Stuff each pasilla pepper with the cheese filling, gently pressing it down to ensure it fills the entire cavity.
-
9.Place the stuffed peppers in a baking dish and pour the tomato sauce over them.
-
10.Cover the baking dish with aluminum foil and bake in the preheated oven for 20 minutes.
-
11.Remove the foil and continue baking for an additional 10 minutes, or until the cheese is melted and bubbly.
-
12.Serve the Chile Pasilla con Queso hot, garnished with fresh cilantro leaves if desired.
Treat your ingredients with care...
- Pasilla peppers — Roasting the peppers enhances their flavor and makes them easier to peel. Be careful when removing the seeds and membranes to avoid tearing the peppers.
- Mexican cheese blend — Use a combination of Oaxaca, Chihuahua, or Queso Fresco for an authentic taste. If these cheeses are not available, you can substitute with Monterey Jack or Mozzarella.
Tips & Tricks
- If you prefer a spicier dish, you can add some finely chopped jalapenos or serrano peppers to the cheese filling.
- For a more indulgent version, you can top the stuffed peppers with some crumbled Mexican chorizo before baking.
- Serve the Chile Pasilla con Queso with warm tortillas or crusty bread to soak up the delicious tomato sauce.
- If you want to add a touch of freshness, squeeze some lime juice over the stuffed peppers before serving.
- Leftovers can be refrigerated and reheated in the oven or microwave. They make a delicious next-day lunch option.
Serving advice
Serve the Chile Pasilla con Queso as a main course accompanied by Mexican rice and refried beans. Garnish with fresh cilantro leaves for added freshness.
Presentation advice
Arrange the stuffed peppers on a platter, drizzle some additional tomato sauce over them, and sprinkle with chopped cilantro. The vibrant colors of the dish will make it visually appealing.
More recipes...
For Chile pasilla con queso

For Mexican cuisine » Browse all

Ahuatle Tacos with Spicy Salsa
Savory Delight: Ahuatle Tacos, a Mexican Culinary Gem

Enchiladas de Pollo con Salsa Verde (Chicken Enchiladas with Green Sauce)
Savory Mexican Delight: Chicken Enchiladas with Tangy Green Sauce
Ayote en Miel (Mexican Honey-Glazed Squash)
Sweet Delight: Mexican Honey-Glazed Squash


More Mexican cuisine dishes » Browse all

Chinicuiles
Chinicuiles are a traditional Mexican dish made with a type of edible worm. They are typically served as a snack or appetizer, and are known for...

Cascaron
Cascaron is a traditional Filipino dessert that is commonly served during special occasions such as birthdays and weddings. It is a deep-fried...

Codornices en salsa de guajillo
Quails in guajillo sauce
Codornices en salsa de guajillo is a traditional Mexican dish that features tender quail in a spicy guajillo pepper sauce. This dish is perfect...